
Guidelines
CELL LINES
PLANT CELL LINES
PLANT VIRUSES
PLASMIDS
PHAGES
MICROORGANISMS
GENOMIC LIBRARIES
PROCEDURES
CATALOGUE
LABORATORY PROCEDURES FOR MICROORGANISMS
Appendix
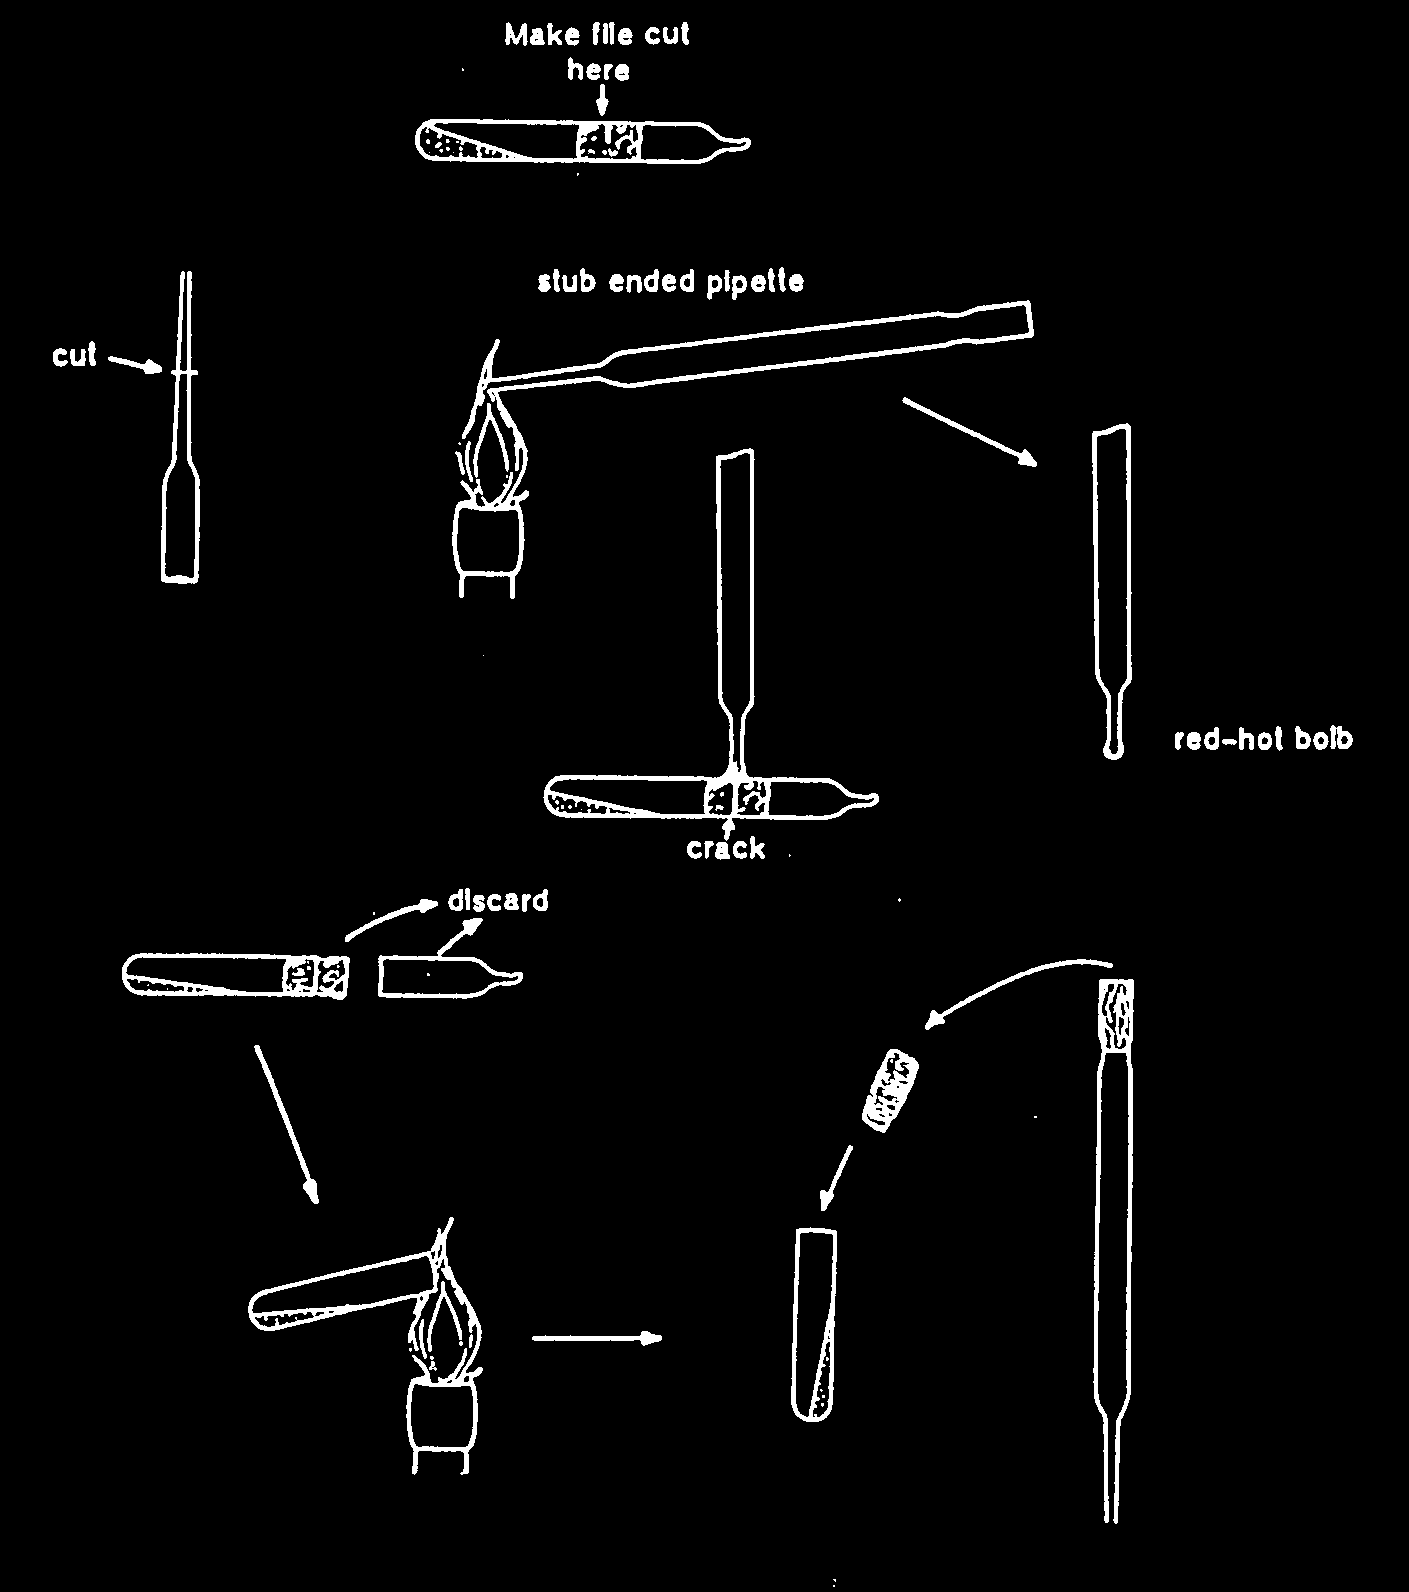
M/1998/3.00 Appendix 5.14 OPENING OF AMPOULES AND REHYDRATION OF (FREEZE)-DRIED CULTURES INTRODUCTION Strains for deposit with the collection may arrive as active or dried or freeze-dried cultures. (Freeze)-dried microorganisms may be sensitive towards oxygen. Therefore, such cultures are generally sealed under vacuum, which means a low partial pressure of oxygen. Care should be taken when opening ampoules of (freeze-)dried cultures, especially with single vial preparations, to avoid (1) contamination of the culture by air entering the ampoule after cracking, (2) release of fine particles of dried microorganisms into the air of the laboratory. A sudden inrush of air results in disturbance of the content, especially if powdery, and a subsequent back-surge of particle loaded air. NOTE: (Freeze)-dried cultures are supplied in vacuum-sealed ampoules. Ampoules can be opened in an ordinary transfer cabinet if cultures belong to hazard group 1. In other cases ampoules should be opened in a biohazard safety cabinet of the appropriate level. Always wear protective glasses when opening ampoules! For the safe opening of the different types of ampoules supplied by collections or laboratories the following methods are proposed. Type 1 vials (double vial preparation) Type 2 vials (single vial preparation, with cotton plug), method A. 1 Using a vial scratcher or glass cutter make a 5 mm file cut on the ampoule at the mid-point of the cotton wool plug. 2 Break off the capillary part of a dropping pipette after the glass has been scratched at a posltion to leave a stub of about 1.5 cm. 3 Heat the tip of the stub-ended pipette ln a hot flame until it becomes a red-hot bulb of molten glass. 4 Immediately press the hot tip against the file cut on the ampoule, which will crack all around along the line of the cut. 5 Allow air to enter slowly before gently removing the pointed top part of the ampoule. Discard the top into a disinfectant jar. 6 Remove the plug which may be impregnated with dried culture material with forceps and discard it into disinfectant.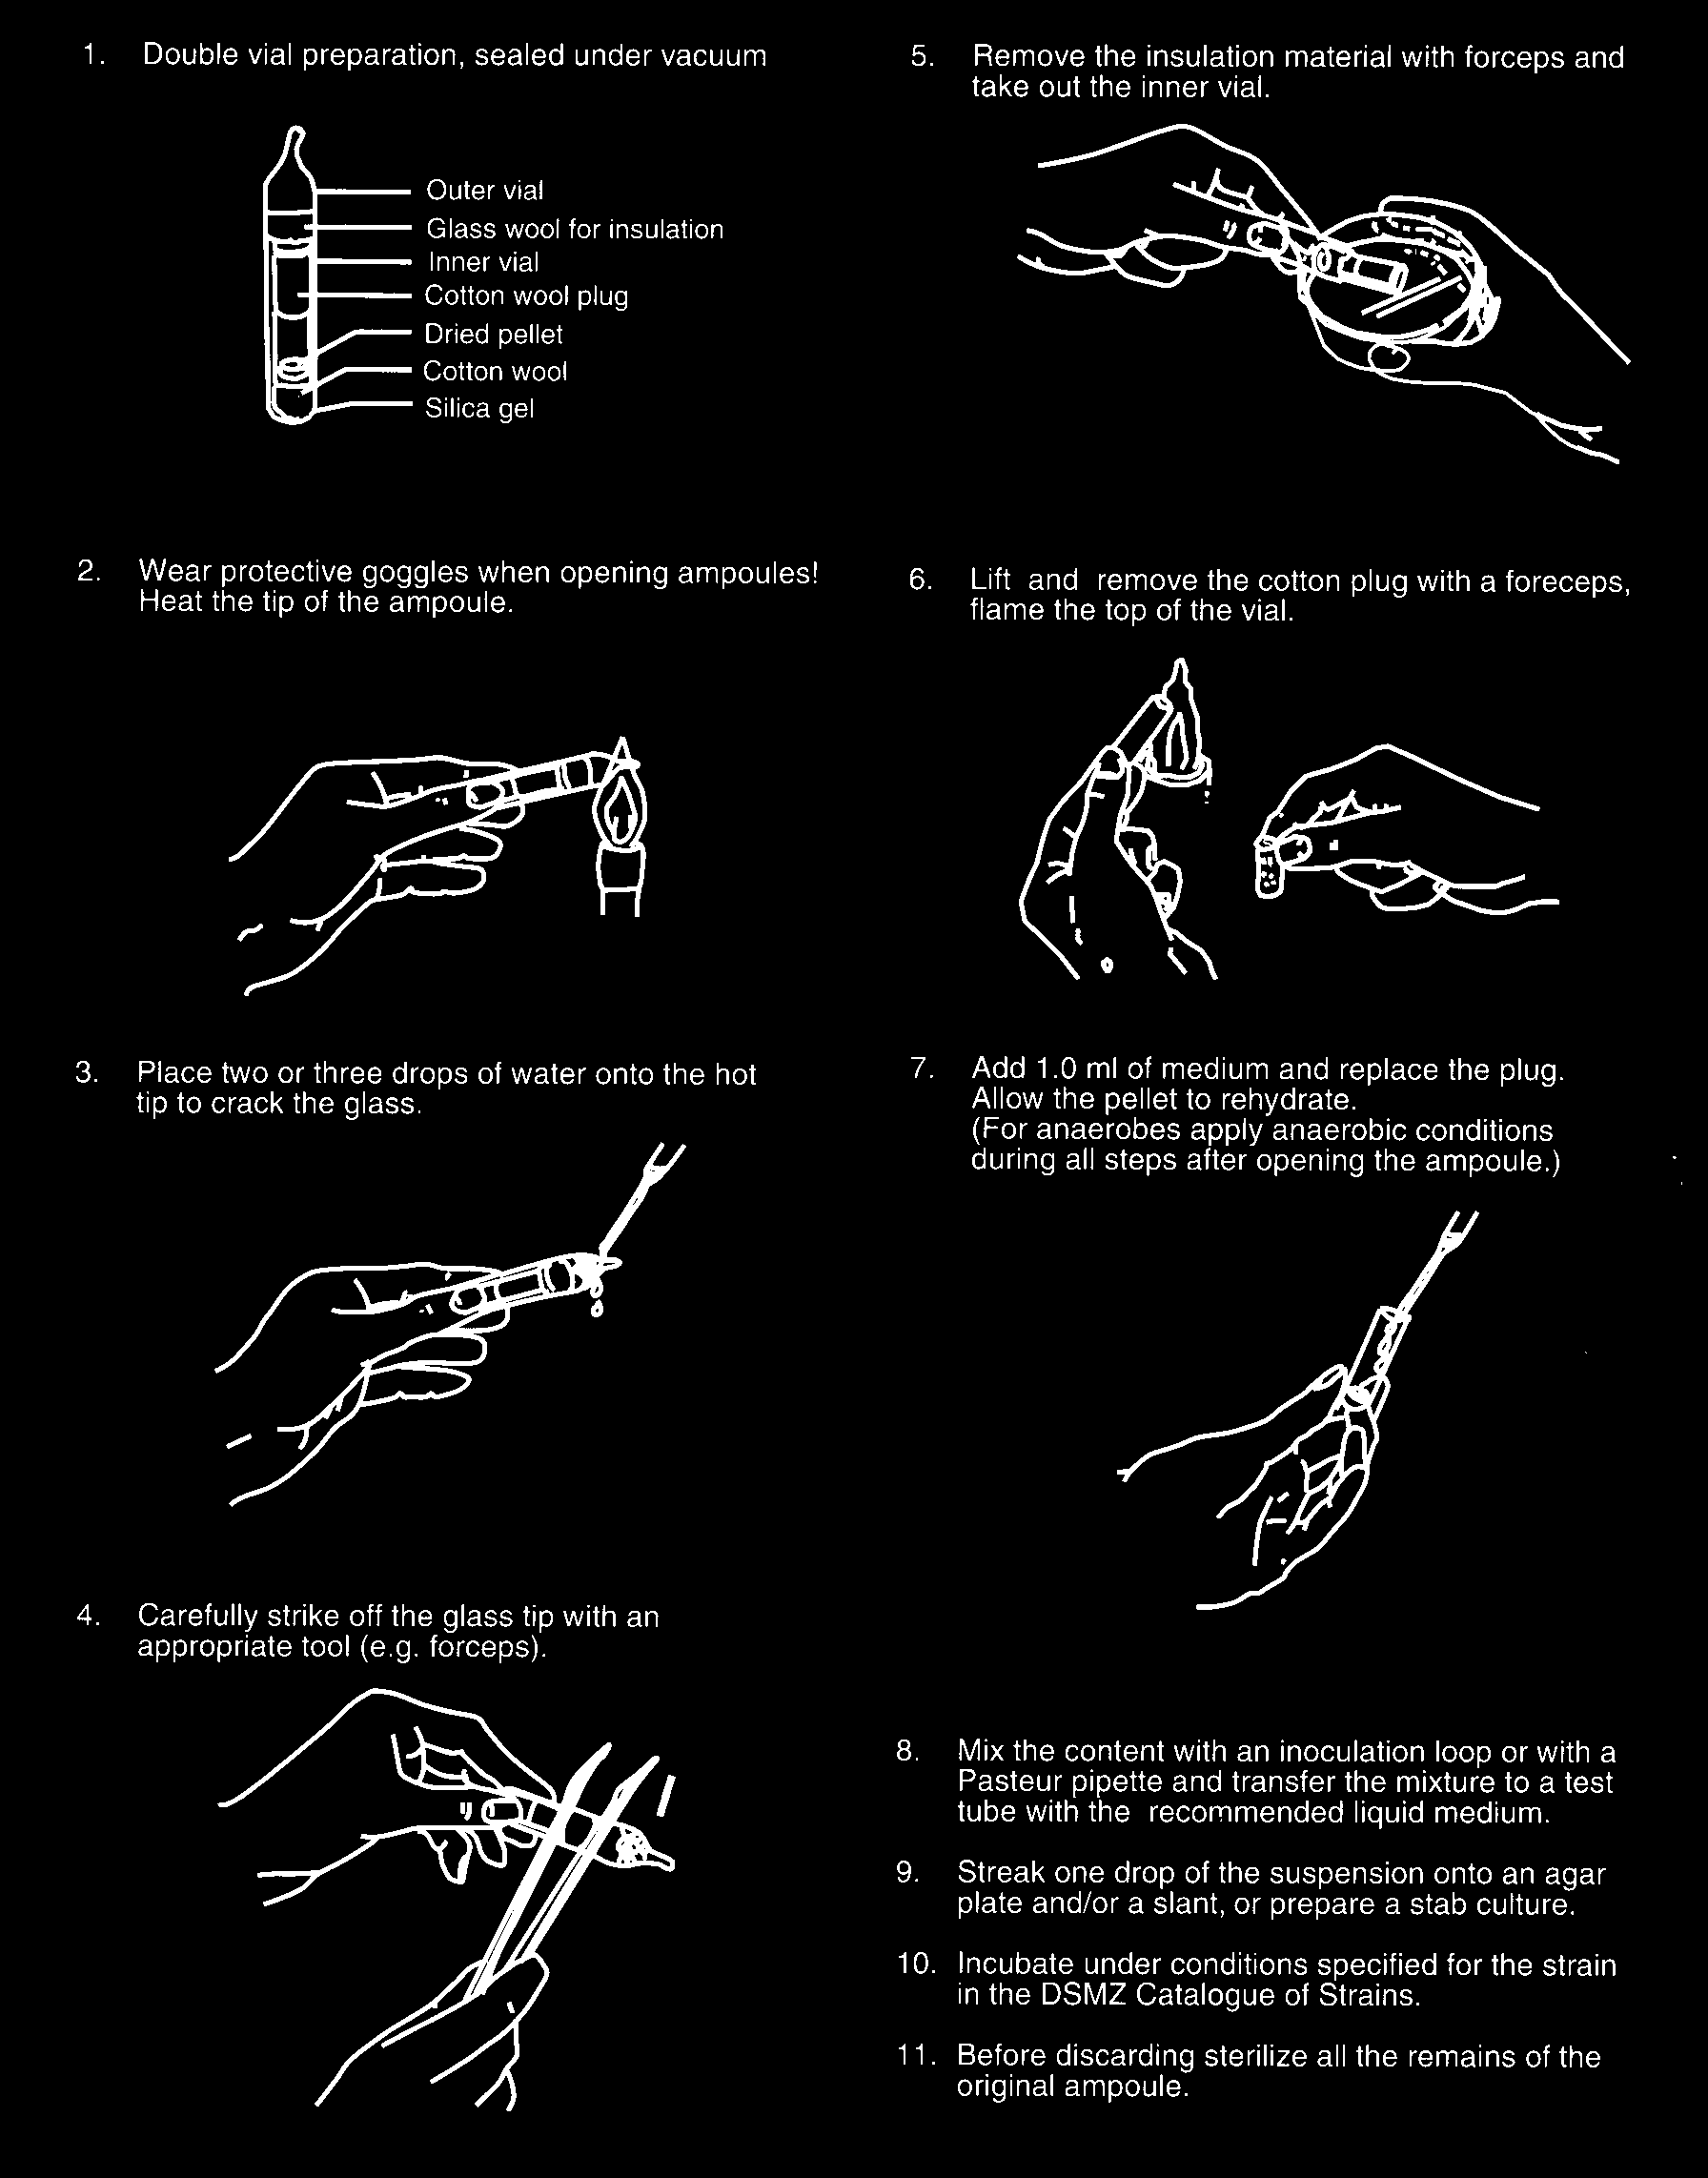
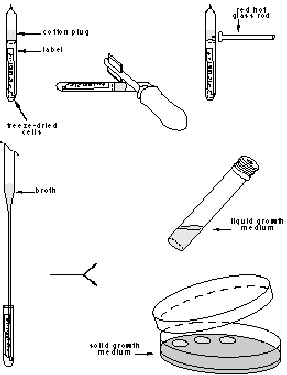
7 Flame the open end of the ampoule and insert a sterile cotton wool plug (e.g. the plug of a Pasteur pipette).
8 Add about 0.5 ml of a suitable broth to the ampoule.
9 Mix the contents and transfer the suspension to a suitable liquid or solid medium.
Note: If the file cut has not been made at the mid- point of the cotton plug, the plug may be blown to the bottom or to the top of the tube, especially if air enters too rapidly after cracking the glass. This is dangerous because fine particles of the dry material may be released into the air of the laboratory!
Type 2b vials (single vial preparation, with cotton plug), method B.
Make a small file mark on the ampoule near the middle of the cotton wool plug. Touch the file mark with a red hot glass rod till the glass cracks. Wait a few seconds to allow air to enter into the ampoule. Remove the upper part of the ampoule and the cotton plug.
Add approximately 0,5 ml of appropriate broth with a sterile Pasteur pipette to the dried material after flaming the open end of the ampoule. Mix the contents gently with the tip of the Pasteur pipette, and transfer the contents to one or more suitable solid and/or liquid media (follow the medium indications given in the list of strains). Allow the cells to rehydrate slowly on solid media. It is advisable to include a general medium in order to detect possible air-borne contaminants which may have been introduced during the opening of the ampoule. All ampoule remains should be sterilized before discarding.
Cultures need at least two times subculturing before they can be optimally used in experiments.
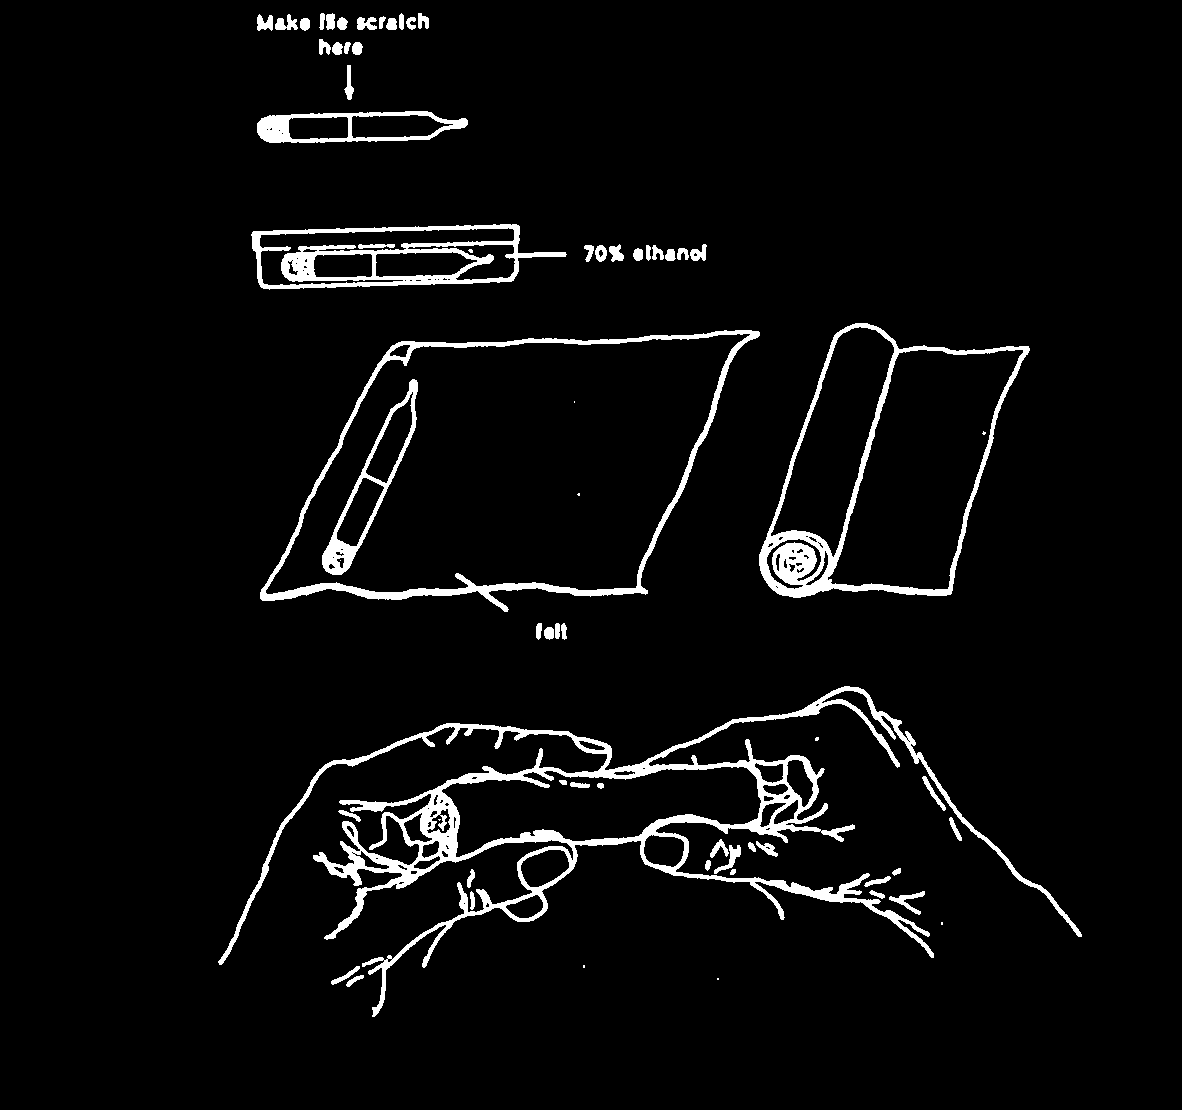
Type 3 vials (single vial preparation, without cotton plug)
1 Using a vial scratcher or glass cutter make a file scratch in the centre all around the ampoule.
2 Place the ampoule in 70% ethanol or other disinfectant for 5 min.
3 Wrap the ampoule In a strip of sterile cotton wool or felt.
4 Carefully break the ampoule at the file scratch by hand.
5 Transfer (dump) the pellet to broth. Do not flame the neck of the broken ampoule since the pellet may stick to the hot glass.
6. Discard both halves of the ampoule in a dlsinfecting jar and sterilize the felt strip.
Guidelines prepared for CABRI by DSMZ, CBS and BCCM, 17 May 1998
Page layout by CERDIC
Copyright CABRI, 1998
© The CABRI Consortium 1999 -
2023
This work cannot be reproduced in whole or in part without the express written permission of the CABRI consortium.
Site maintained by Paolo Romano. Last revised on February 2023.